


3.4.5 Functions in the Context-Sensitive Menu
The
context-sensitive menu
offers you several functions for manipulating data on the server. The menu
contains the following items:
- New: Allows you to create a new collection or cluster on the
server. Any document classes declared for the server in question will also
appear under the item New. For more information on Document Classes in
Hyperwave Virtual Folders, see
page
120.
- Delete: Allows you to delete a document or recursively delete a
collection. If an error occurs while deleting the files, the delete operation
will stop at the location where the error occurred.
- Modify: Allows you to change the attributes of a collection
recursively (see
page
172).
- Checkout: This command checks out single or multiple selected
documents.
- Checkin: This command checks in selected document(s). Before
check-in, you are given the option of entering a comment for the version, and
to force check-in of documents that are not already version controlled. You can
also choose not to check in a document unless its content has been changed. You
can increase the minor version number for the objects, e.g. 4.2 becomes 4.3, or
the major version number, e.g. 4.2 becomes 5.0.
- Create Configuration: Allows you to save the entire file hierarchy
to a configuration file. How to manage configurations with Hyperwave Virtual
Folders is explained on
page
179. For more information on the Configurations feature in general, see
page
108.
- Configuration Control: This menu item will only appear when the
object you are clicking on is a configuration object. It gives you access to
the Properties dialog box, with the Configurations tab. Here you
can Create, Merge, Restore, Delete and Select configurations. See
page
179.
- Properties: Allows you to change the attributes of the current
object and gives you access to all Version Control commands for the object (see
page
174).
ADDITIONAL MENU ITEMS
If the object you click on for the context sensitive menu is a document, rather
than a collection or cluster, you will receive other menu options on the
context-sensitive menu. These options are system dependent. For example, you
might be offered the options to
Note: All times displayed in
Hyperwave Virtual Folders correspond to the system time settings.
MODIFY
The
Modify function allows you to recursively change the attributes of a
collection and its contents.
When you select the Modify item, the Modify Attributes dialog box
appears (see Figure 115). Use the Add, Remove and Change
buttons to make a list of the attributes you want to add, delete and modify.
You can either choose the attributes from the list in the secondary dialog
boxes that appear, or enter custom attributes in the text fields (see Figure
116, for example). Click on OK to apply the changes. Remember that you
must check out version controlled documents before you can modify their
attributes.
 Figure 115: The Modify Attributes dialog box
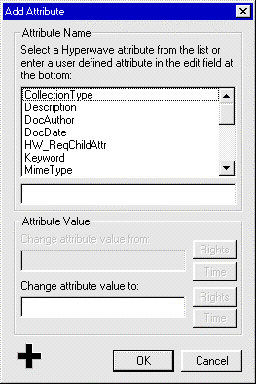
Figure 116: Add Attributes dialog box
Note: when using the Remove Attribute and Change
Attribute dialog boxes, the attribute name and value must be exactly
right or the recursive search will not be able to find the corresponding
attribute-value pair to change or delete.
PROPERTIES
This
option allows you to modify the attributes of the selected object as explained
below. Remember that you must check out version controlled documents if you
want to modify their attributes.
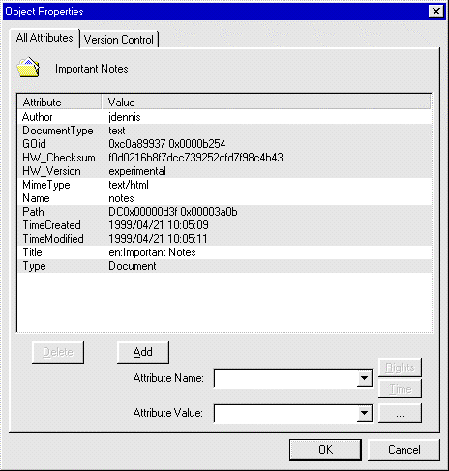 Figure 117: Object properties
- Modify: To change an attribute value, click on the value (only the
attributes that have a white background can be modified). A black outline will
appear around the attribute value (like when you rename a file in Windows
applications). Enter the new value and click on the OK button.
- Delete: To delete attributes, select an attribute and click on the
Delete button and then the OK button.
- Add: To add a new attribute, enter an attribute name and value in
the appropriate text boxes (see Figure 117) and click on the Add button
and then the OK button.

- Rights: This button gives you access to the Rights Wizard, which
helps you set read, write and unlink rights for the object. To activate this
button, you must click on the arrow beside the Attribute Name drop box, and
choose Rights from the list of Attributes. When you click on the Rights button,
the Rights wizard will appear. See Figure 118.
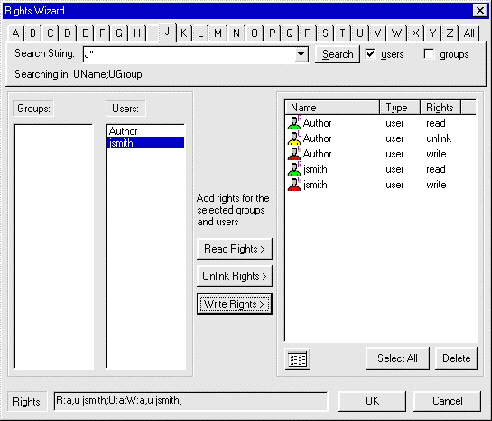 Figure 118: Rights Wizard dialog box
RIGHTS WIZARD
To set rights for a particular user:
- Click on the letter tab corresponding to the first letter of the username
(or on the tab labeled All) and then click on the Search button.
All usernames corresponding to the letter you picked will appear in the columns
on the left of the dialog box. If you select the checkbox Groups as well
as the checkbox Users to the right of the Search button, both
user and group names will be delivered from the search.
- Select the user (or group) for which you want to set rights, and click on
the appropriate buttons. The user or group name will appear in the viewing
window on the right, along with an icon indicating what sort of rights have
been set (W= write, U= unlink, R= read).
- You can delete individual entries using the Delete button, or
select all the entries (Select All) and delete them all.
- You can also change how the set rights are organized in the viewing window
by clicking on the button left of the Select All button (
 )
)
You will notice that the rights syntax appears in the bottom left
of the dialog box as you set the rights.
- When you have set all the rights to your satisfaction, click on the OK
button.

- Time: This button gives you access to the Time Wizard, which helps
you set time values for the attributes TimeExpired and TimeOpen. When you click
on the Time button, a secondary dialog box will appear, where you can
easily set times and dates. See Figure 119.
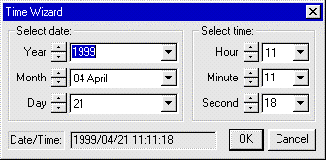 Figure 119: Time Wizard dialog box
TIME WIZARD
To set time values for attributes TimeExpired and TimeOpen:
- From the Attribute Name drop box, choose TimeExpired or TimeOpen.
This will activate the Time button.
- Click on the Time button. The Time Wizard dialog box (Figure 119)
will open.
- Set the date and time as desired, using the up and down arrows to the left
of each text box, or selecting particular values from the drop boxes. You will
notice that the exact time and date will appear in the bottom left of the
dialog box as you set it.
- When you have set the time and date to your satisfaction, click on the
OK button.

- ...: The button beside the Attribute Value text
box allows you to edit the value in a separate window. If, for example, you
click on the Title attribute, its value will appear in the Attribute Value
box. You can edit this value in a separate window by clicking on the button
.... See Figure 120.
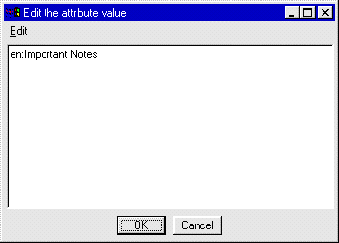 Figure 120: Separate dialog box for editing attribute
values
When you have edited the attribute value to your satisfaction, click on the
OK button.
Click
on the Version Control tab in the Properties dialog box to check
in or check out a document, to revert to an older version of the object, delete
a particular version of the object, or to take an object out of version control
(see Figure 121).
Just select the version on which you wish to perform the action, and click on
the appropriately labeled buttons to execute specific commands.
See the main section on Version Control for more information on these commands (
page
95)

Figure 121: Version control with Virtual Folders
CHECK OUT
Starting with Version 5.1 of the HWIS, it is possible to check out a version of
the document other than the most recent version. This version can be worked on
in the normal fashion.
SET COMMITTED VERSION
Starting
with Version 5.1 of the HWIS, it is also possible to commit a version of a
document other than the most recent version. This committed version will then
appear for appropriate users in the document listing in Microsoft Explorer
view. Versions more recent than the committed version will not be deleted: they
remain on the server and can be checked out and worked on as usual.
In the case of Check Out, Take Out, Revert to Version, Set
committed version or Delete Version, you must enter a valid version
number in the small text box left of the buttons, or click on the appropriate
version number in the version listing to make the number appear in the text
box.
VIEWING PREVIOUS VERSIONS
If you double click on a version number in the version listing, the version in
question will be downloaded to the spooler path (as specified in the spooler
options) and will also be opened for viewing.
CHECK IN
When checking in an object, a dialog appears (see Figure 122) where you can
enter a version number and a description for the new version. You can choose to
increase the minor or the major version number of the version. By default, the
server will increase the minor version number by one.
If you select the checkbox labeled Force check in of documents currently not
version controlled, all documents will be checked in, regardless of whether
they are already under Version Control.
If you select the checkbox labeled Check in only if documents have
changed, documents that have not been modified will not be checked in. In
this case, the previous version number will be reverted to.
If you select the checkbox labeled Automatically commit version, the
version you are checking in will be committed. The committed version is the
version that users with read access can view and users with write access can
edit. If you do not select this checkbox, the committed version will be either
the last version for which this checkbox was selected on checkin, or whatever
version was manually set as "committed".
 Figure 122: Checking in an object with Virtual Folders
CHECK IN AND OUT WITH CONTEXT-SENSITIVE MENU
Remember that you can also check in and check out versions by using the context
sensitive menu in the Explorer view. See
page
171 for more information.
Note: Sometimes the view is not correctly updated after the
status of an object is changed. If this happens it is recommended to refresh
(F5 key) the Explorer view.
As
mentioned in the list of functions on the context-sensitive menu (
page
171), you can save the file hierarchy under any given collection as a
configuration file.
If the object you display properties for is a configuration object, the
Object Properties dialog box will have a tab labeled
Configurations instead of the Version Control tab. See Figure
123.
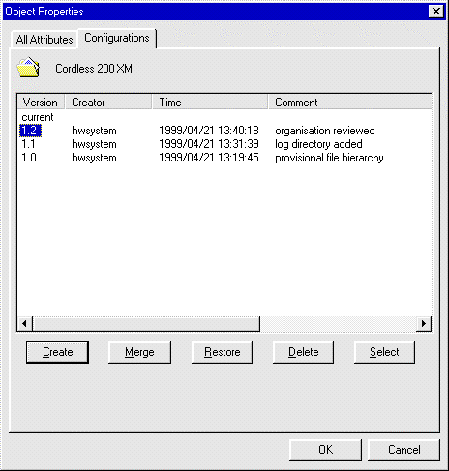 Figure 123: Configuration Control with Virtual Folders
Note that this dialog is also available by choosing Configuration Control
from the context sensitive menu. This item will only appear on the menu if
the object has already been saved as a configuration.
In the Configuration Control dialog box you can Create a new
configuration object from the current collection hierarchy, Merge a
previous configuration with the current hierarchy, Restore a previous
configuration to the server, Delete a particular configuration or
Select a previous configuration for display in Virtual Folders.
CREATE CONFIGURATION
To create a configuration:
- In the Explorer view, click with your right mouse button on the object
from which you want to create the configuration.
- From the context sensitive menu that appears, choose Configuration
Control.
- In the dialog box that appears click on the Create button. A
secondary dialog box appears where you can confirm the version number being
assigned to the configuration and add a comment.
- Click on the OK button.
The configuration will be added to the
configuration listing, including version number and comment (if any).
MERGE CONFIGURATION
To merge a configuration with the current configuration file:
- In the Explorer view, click with your right mouse button on the object in
question and choose Configuration Control from the context sensitive
menu that appears.
- In the dialog box that appears, click on the version number of the
configuration you want to merge with the current information on the server.
- Click on the Merge button. The file hierarchy will be uploaded
without deleting or overwriting any information that is on the server.
- Click on the OK button.
RESTORE CONFIGURATION
To restore a previous configuration as the current version:
- In the Explorer view, click with your right mouse button on the object in
question and choose Configuration Control from the context sensitive
menu that appears.
- In the dialog box that appears, click on the version number of the
configuration you want to restore as the current version.
- Click on the Restore button. This version will be restored to the
server, and the current configuration will be overwritten.
- Click on the OK button.
DELETE CONFIGURATION
To delete a configuration:
- In the Explorer view, click with your right mouse button on the object in
question and choose Configuration Control from the context sensitive
menu that appears.
- In the dialog box that appears, click on the version number of the
configuration you want to delete.
- Click on the Delete button. The version will be deleted from the
configuration history. It is not possible to delete the current configuration
version, as it is stored on the server and not as an archived file.
- Click on the OK button.
SELECT CONFIGURATION
To display a configuration other than the current configuration:
- In the Explorer view, click with your right mouse button on the object in
question and choose Configuration Control from the context sensitive
menu that appears.
- In the dialog box that appears, click on the version number of the
configuration you want to select for display.
- Click on the Select button. This configuration will now be the one
that is displayed in the Windows Explorer view. Documents in this configuration
can be viewed but not edited (it is an archived configuration object, not an
active server collection hierarchy).
- Click on the OK button.


|
|
Benutzer: gast •
Besitzer: hwsystem • Zuletzt gešndert am:
|
|
|


